The home page is usually the first page a user lands on when they come to a website and is often the place where users return to when they want to get a general idea of what your business offers. So, it is important that the home page is designed carefully with the user and your end goals in mind.
You have a matter of seconds to capture your visitor’s attention, so if they can’t find what they want in that time frame, or your site does not make a good first impression, you risk losing them.
The following are the key things the home page should accommodate:
Site identity and mission: What the site is, what it is for, and why the visitor should use it. Your logo, tagline and hero statement are crucial for this. These tell your potential customer exactly what you offer so that they know they’re in the right place, will carry on browsing, and ultimately perform your desired action.
Site hierarchy: Give an overview of what the site has to offer, both content and how it’s organised. This means website users can quickly scan the page and understand where they are, and how to access the information they are looking for. The main navigation is key for this.
Search: Have a prominently displayed search box. This caters for those users that are search centric, or for when people can’t find what they’re looking for. Offering multiple ways to navigate a website is important to capture all visitor’s browsing habits. TIP! Review users search terms on occasion and use this information to improve your content and/or navigation.
Shortcuts and key pathways: Shortcuts to the most frequently requested pieces of content, or to the main pathways you want your visitors to take. This takes the guess work out and directs them straight to where they need to go.
Teasers: Entice the user with hints of “good stuff”! This will keep them interested and want to stay. Think great imagery, blog posts, specials.
Timely content: Ideallythe home page should contain content which is updated frequently, to give the website signs of life.
Registration: If the site has a registration or sign up, have a link to this from the home page.
The home page (and other key landing pages) also need to fulfil some other objectives.
Show the users what they are looking for – make it obvious how they can get what they want.
Show them what they are not looking for – expose them to other great things your site has to offer and that they might be interested in.
Establish credibility and trust – this may be the only chance you get to create a good first impression. Reviews and testimonials are a great way to do this, as well as having a secure website and professional feel. TIP! Make asking for reviews part of your users purchasing process. Put links to submit reviews into order confirmed emails or set up email templates to send to clients if you’re a service-based business.
While these tips are all certainly important for your home page, the reality is that the home page is often only the first point of entry to your website 30-50% of the time. So, it’s also vital to think about many of these factors on ALL your website pages (in particular, what website they are on, what you do, where they are, and how the website is organised), so visitors get a good first impression no matter which page they enter the website on.
(Sources – Nielsen & Loranger, Krug, and our own years of experience!)
There are many factors that go into creating a successful website, but if we must break it down into the three main building blocks of a great site, they would be design, usability, and content. You need all three of these for a website to be successful. Here’s why:
Design: The design and aesthetics of a website are what hooks the user and piques their interest. This will be the first thing that captures their interest in your website. If it’s not aesthetically pleasing, is cluttered or plain ugly, you’re likely to lose visitors quickly.
Usability: It doesn’t matter how pretty your website is, if its hard to use then your users are unlikely to stay and convert. So how user friendly the website is is what will make them stay on your website and browse for longer. Think easy navigation, clear pathways, good amounts of white space, fast page loads times and readable, scannable content.
Content: And the two things above will be completely irrelevant unless your website provides the content your visitors want. The content on your site and how well it meets their needs, is what will make them take the next step and perform your desired action.
All usability and design principles are important, but by themselves in isolation they are unlikely to cause a site to fail completely unless they are implemented very badly! While these principles alone may not cause a site to completely fail, they play a significant role in user satisfaction. The more usability and design issues that are present, the more frustrated users may become, requiring more effort to accomplish their goals. So even if a website excels in usability principals, if the site is not attractive, useful or does not give value to the user, it will not matter.
People develop first impressions about a website in a matter of seconds. However, these impressions can change once users start interacting with the site. If the design initially captures their attention but the site lacks usability, users are likely to abandon it. Similarly, if a website looks great and is easy to use but fails to provide the necessary content, users will still leave. And lastly, if you have fabulous content, but the design and usability are poor, the chances are your users won’t ever reach or find your content.
So, in conclusion, you need design to hook the user, usability to make them stay, and content to meet their goals. Content is often the most overlooked part, but in reality, it is probably the most important – content is King, so they say!
These days businesses have a lot of online accounts to keep track of – social media, website, web hosting and domain, EDM platforms, Google accounts, M365 accounts, and more. When someone leaves your business that manages these accounts, or has access to them, it is really important that every account is checked and updated as necessary, in case the account relies on that person’s email or phone number for logging in or for two-factor verification. Not doing so can mean getting shut out of important accounts, not having access to your data, or worst-case scenario having the account shut down or cancelled.
The following is a list of some of the key accounts that need to be checked BEFORE your employee leaves, followed by our best practice tips for protecting yourself. This is not an exhaustive list, but some of the most common accounts that will need to be checked.
Social Media
Instagram accounts will often be set up with someone’s phone number attached to it. So make sure you check and change this if necessary. Verification messages may also get sent to this number. Also check the email address on the account.
Check any other accounts you have, such as Pinterest.
Make sure you have the up to date login details for any accounts that have separate login details.
Facebook
Facebook warrants its own section, as this is the most likely one to cause problems! Most Facebook pages are “owned” by a Meta Business Account, so it is really important that you know which individuals have access to this account, particularly any admins. It can cause massive headaches if you lose access to the Meta Business Account, and will mean there are certain actions you will not be able to perform on Facebook and Instagram. Furthermore, trying to prove you own a Facebook page or Meta Account can be extremely time consuming and often nearly impossible to rectify. So, make sure you check the following:
Who has page-level and task-level access to your Facebook page(s)
Who has been added as a user to your Meta Business Manager account, and what assets each user has been given access to
Check your Ad Accounts, payment methods, commerce accounts and pixels and who has access to these.
When someone leaves, make sure you remove them from all the above, and ensure that you still have two or more other people who have access to everything, including at least one admin.
MailChimp or Other EDM Platform
Make sure you check your MailChimp account (or other EDM platform), and see whos’ email address has been used on the account – also check individual lists and their contacts, as these are often set individually. Also check the “from” email address used for lists/campaigns.
Check and change the identity verification method and/or two-factor authentication settings if needed – these will often be linked to the person who is using the account the most, so if this person leaves you will not be able to verify your identity when you try and login.
Google
Some businesses have multiple Google accounts, and these days it’s basically impossible to log in to any Google account without two-factor authentication or identity verification. So, if someone else has their own mobile number or email address connected to either of these, its near on impossible to gain access without jumping through a lot of hoops. Your Google account is how you access the following Google products, so you do not want to lose access!
Google Analytics
Google Ads
Google My Business / Google maps listing
Gmail
YouTube
Google Workspace
Google Drive
So go into your overall Google account (https://myaccount.google.com/), and check your personal information settings and Security settings (make sure you also check each login method plus the recovery emails and phone numbers).
Hosting and Domain Names
Make sure the email and phone number on your domain name account and hosting accounts are current, active and accessible – otherwise you might miss an important renewal email and have your website turned off.
Website
Check which users have login rights to your website. If the person leaving uses a generic login (such as “admin”) that other people also use, it could be a good idea to change the password. If they have their own personal login, you can just delete / deactivate their login.
Payment Accounts
For example, Stripe, eWay or PayPal. If the person leaving set these up or controls the accounts, the account could be linked to their own email or phone, along with the verification methods. So check and change as necessary. Also be aware that changing account details such as the email and password may reset any API connections, so make sure you check this afterwards.
Other Tools
Some other good ones to check if you use them are Canva and social media management tools.
Our best practices for future proofing
Try and use a generic email address on all your accounts that more than one person has access to, or that will not change when someone leaves, such as admin@, info@, marketing@.
Where possible, always have more than one person on Social accounts. NEVER have just one person added as an admin to a Facebook account. The reason for this is two-fold – 1. If someone’s personal Facebook account gets hacked or compromised, you have a back-up person who can access the account, and 2. If someone leaves, you have a backup person who can access the account. Having a neutral 3rd party added to your Facebook page or Meta Business Account, such as an agency, is also a good protection option.
If you must set up two-factor authentication or an additional verification/contact method, where possible/practical try and have this set to a generic email, or to a phone number that is less likely to change, i.e. the owner or someone else high up in the organisation.
Keep an updated, live record of all your accounts, passwords, what email is attached to them, and who the two-factor authentication will go to. This way if someone needs to access an account, they can easily find the login details and/or who the verification request will get sent to.
Imagery can make up a large component of a website, so having optimised images is good not only for SEO, but also for the users’ experience.
The size, filename, and tags of an image are all factors for Search Engine Optimisation – helping search engines understand what an image is about, and keeping the size of the website small so it loads quickly.
The size and title of an image also impacts your users’ experience – large images are slow to load, and can cause the whole page to be slow (which can be very frustrating for your website visitors). Plus, your visitors are essentially downloading these images, and if they’re using mobile data this can eat away at their data.
Here are four key things that should be considered when managing the images on your website, to help improve SEO and also your users’ experience on your website.
Image Size Every extra image or file that is on a website creates additional load that has to be downloaded to someone’s computer/device from the server the website is hosted on. The larger the image size is, the longer it will take to download and the longer it will take the web page to load. Not only is this frustrating for the person trying to load the website, website page speeds and load times are now an SEO issue, as it is one of Google’s ranking factors. So, it is important to keep websites light and fast.
Before images are loaded to the website, they should be resized. If an image on the web page will only be displayed at 520px wide, then it’s unnecessary to upload the image at 3,000px wide at 300 DPI (which is really meant for print). A good rule of thumb is to try and get smaller in-page images down under 100-200kb in size. For large banner-type images having them larger is fine, but still under 500kb, or as close to it as possible. These images are often displayed at around 1,920px – 2,000px, so will need to be larger. For banner images, it’s also important that the image is actually big enough for the space – if it is too small it will get stretched and then look blurry, which does not give a good first impression.
One final thing to consider is the orientation of your photos – try and make sure you choose an image that fits the space, or can be cropped to the correct dimensions.
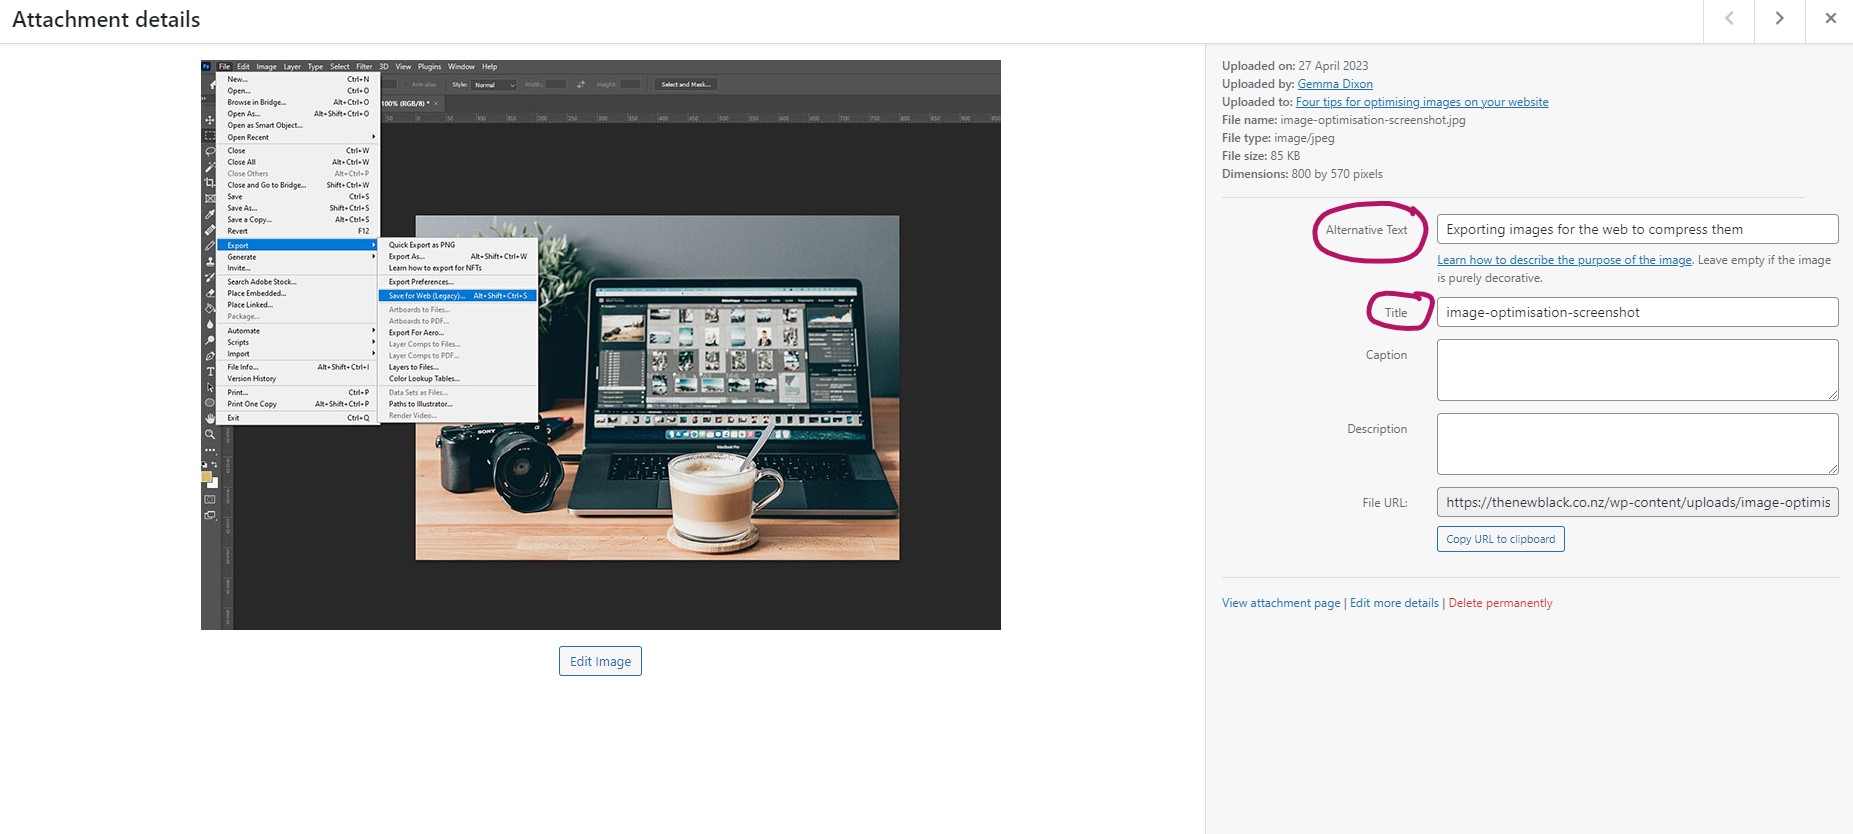
Compressionand file type After resizing your images, sometimes they will still to be too large in terms of file size. Some images and photos retain a lot of unnecessary data within the image, which for web and screen purposes can be stripped out. Another thing to keep in mind is the file type. PNG images tend to be larger than JPGs, so unless there is a reason why the image needs to be a PNG (such as it needs a transparent background, it’s clearcut etc.), convert the image into a JPG or WEBP file.
After resizing your images, it is good practice to also compress the images. There are plenty of free web compression tools out there, but the one we use is tinyjpg.com. This will strip out the unnecessary stuff and get the file as small as possible. If you have Photoshop, you can also use the ”Export for web” feature which will also compress the image, and this can also change the file type if you need to as well.
Image file name and title Naming files correctly helps search engines understand what an image is about – search engines use the file name and the alt tag (see below) to “see” an image. A file name such as DSC_495869.jpg means nothing to search engines (or users!). However, something like blue-leather-handbag.jpg has a lot more meaning and context. Try and rename image files before uploading them to the website.
WordPress also automatically takes the file name and turns it into the image title, so this is important to keep in mind as well, especially if the title is being converted into the image alt tag. Sometimes, the image title will also appear when you hover over an image on the website – so to make it look more professional, and also make sense to your visitors, having something meaningful in the WordPress image title field is good practice. Having good image titles also makes it much easier looking for images in your media library later. You can edit the titles later, but this creates more work.
Image alt tags All images on a website should have image alt text, which should contain a keyword rich description about the image. Search engines cannot read images, so the alt attribute is what tells the search engine what the image is about – so it is an important factor for SEO. It will also appear as a text description of the image if an image does not load in a visitor’s browser and is also used for screen readers. So, it is important that the alt tag actually describes the image, in a keyword-optimised way.
Last Year Google launched their latest version of Google Analytics – GA4; and the current version, Universal Analytics (UA), is being discontinued from July 2023. So, lets take a look at what you need to know.
What’s changed?
A lot! GA4 is very different to the previous versions of Analytics. But for the everyday client that doesn’t use Google Analytics a lot, or that relies on an agency for their data, we’ll just stick to some of the key, most noticeable differences.
GA4 moves from a hit-based, pageview and session focus to a user centric, event-based module. Because of this, the method of collecting data is different, and so the stats will differ slightly (or a lot in same cases) if you were comparing the same metric in GA4 with UA. This is just something to be aware of when comparing new data to previous data collected with the old method, for example, if comparing May 2023 with May 2022. Differences may not be a cause for concern, as it could be the method of collection that has caused the change. For example, the method for determining a session and what resets/ends a session is slightly different between the two versions, so if you were looking at the number of sessions for the same period in UA vs GA4, they would be different.
Another key difference of GA4 is the ability to track website and app data in the same property – for those businesses with an app, it gives a more holistic view of your users and their journey with your business online – user behaviour can be tracked across multiple devices and platforms, including web, mobile, and even offline interactions. This is especially useful in a world where customers often interact with businesses through multiple touchpoints.
GA4 automatically recognises and collects data on several website events, such as pageviews, clicks, downloads, form starts etc. This is a nice benefit that UA did not offer. It is also easier to measure other simple events than previous versions of Analytics, as you can add them directly into the admin area (you do need some knowledge of events and Google Analytics to do this, but there is no coding involved). With UA, custom events had to be either hardcoded into the website code by a developer, or we had to use Google Tag Manager (GTM). GA4 is more similar to GTM in its method of tracking events.
In a lot of cases, we will still use GTM to track events and conversions, but for a simple website with one or two simple custom events, this could easily be done from the GA admin area. However, some of the methods we used previously to track a Goal in UA are now no longer available in the GA4 interface, so these would need to implemented using GTM instead (such as tracking a conversion based on the user viewing a certain page, like a thank you page).
One of the other main differences between UA and GA4 is the reporting interface. GA4 is quite different, with a stripped back collection of reports available by default. But there is a comprehensive custom reports section where you can create your own reports, and a library of additional reports you can add. This takes some getting used to when you are used to the plethora of reports available in UA. For more complex websites, it has taken some time to find and set up the reports that we need and use regularly. But the upside is there is a lot less bloat in the interface by default.
One of the biggest changes we’ve noticed is with the engagement metrics. Instead of metrics such as bounce rate and time on page, GA4 gives us “engaged sessions” and “average engagement time” – and these figures look quite different to the UA data. So, this will also take some getting used to.
What do I need to take away from this?
If you don’t regularly use Google Analytics, but rely on us for your data, then not much! The main thing you need to be aware of is that your report may look a bit different going forward, as we start to remove some of the old UA metrics and replace them with the equivalent GA4 ones. Also, it’s good to be aware of the differences in the data collection methods, as data and comparisons may appear different to normal or inaccurate.
If you don’t currently check your Analytics and would like to understand more about how your website is performing for your business, or better understand your customers and grow your business – get in touch with us. We can arrange a one-off report, do regularly monthly reporting, quarterly reporting, and more.